Author Topic: Filmwasters Guide to the Pakon F135 Plus scanner  (Read 232681 times)

tkmedia

  • Self-Coat
  • *****
  • Posts: 898
    • Camera-wiki the free camera encyclopedia
Filmwasters Guide to the Pakon F135 Plus scanner
« on: January 27, 2014, 04:31:57 AM »


The Pakon F135 Plus is a 35mm film scanner. The original version was available in 2004, the plus version was released in 2006. The plus can scan at a higher 3000 x 2000 while the original version can only scan to 1500 X 2250.

History
Pakon, Inc. was based in Minnetonka, Minnesota in the United States. It was formed in the mid-1980's from the previous company known as Pako, which for more than half a century was known as a supplier of photographic slide mounts and mounting equipment primarily for the photofinishing / minilab market. They formed their Impak branding in 1996 to be used for their scanners. Earlier roll film scanners such as the Impak DIS-100, DFS-100, DFS-200, F6 and F12 were released. In 2001, Eastman Kodak acquired Pakon, but was operated as a independent subsidiary of Kodak. Afterwards models such as the F235, F235C, F235 plus and F335 were released.

The F135 scanners was also distributed and branded by Kodak (for Kodak APEX dry lab), HP (HP RPS lab), Nexlab and Phogenix (a scraped HP and Kodak project for inkjet minilabs). It is often integrated in many turnkey photofinishing systems from various vendors such as chemist, and print shops. It can operate in a stand alone method, so it can be used as a addition to older non digital minilabs. It was primarily marketed for producing scan CD's like Kodak Picture CD.

Currently (2014-)
The mass market consumer shift to digital capture has reduced the need for minilabs and film scanners in every major street corner chemist shops. Many of them have been decommissioned over the past few years. I bought mine originally in Brooklyn, New York for $200 from a company dealing with surplus minilab equipment. A additional unit was bought from AAA Imaging. Since it was mostly designed for stand alone operation it can easily integrate into an existing photographers hybrid photo environment. This is also a great option for traditional photographers to quickly proof their negatives for enlarging. The F135 was designed specifically for 35mm film, and unlike other multi-format minilab scanners it does not require any adapters, loading film onto spools or other misc parts which can be difficult to locate or expensive to find second hand. Many minilab scanner systems require a software reinstall or modification on the controller/processor computer in order to operate without a printer. The included software, though odd is simple and often less complex to use compared to most digital minilabs like Fuji Frontier S, Noritsu EZ controller, and Kodak DLS, etc.

Compatibility support
It is no longer supported by any manufacturer as Pakon was shuttered in 2008. It does not work with current computer operating systems. It is designed for Microsoft's Windows XP. Use of an older computer is strongly recommended, but there is some success using VM (Virtual Machines) software on more current operating systems on both Windows and Mac.

Minimum system requirements are 2000-2008 era PC using a Pentium III 700 MHz MMX or higher CPU, 4GB free hard drive space, 256 MB of RAM, and USB 2. Running Windows XP, .net 1.1, and a screen resolution of 1024x768 or higher. Newer faster computers may still work, but some newer systems may not have older drivers compatible with Windows XP.

Description
The scanner is very odd looking, looking somewhat like a dog dish, or electric vegetable chopper. The F135 is very fast. Again, one of the contributing reasons is that it does not use any film holders. Film is fed through a slot on the right side and exits to the left with the scanned film resting in the built-in bin. The front of the bin curves downward, I find this useful for resting the palm of your right hand while feeding film ;), but was mostly designed to easily retrieve the scanned film. The films lighting source now uses a LED based system instead of the 50-watt SoLux halogen type bulb of Pakon's F235 series scanners that need to be replaced periodically. The unit weighs 4kg and dimensions are at 317 x 343 x 406mm.

The included power adapter is similar to the type found on most portable computer laptops or other electronics. It is a multi voltage region brick and accept voltage from 100-240C~1.8A, with 50-60Hz with outputs of 15V at 4.0A. The connector is positive in the center and negative outside. The outlet is a C14 type male plug, so a removable C13 female lead plug is required on the adapter end and your regional household plug on the other end. Since a majority of these units were removed from American labs, they typically include a NEMA 5-15 plug which is two flat parallel blades with a third round earth pin.


The top of the unit has status diodes for power, lamp and film. These LED are an important part of the system and can blink, as well as change from green, red, yellow state.

LED
Power LEDMiddle LEDRight Film LED
GreenOnGreenScanner readyGreenScanning
OffOffBlinking Green ScanningBlinking GreenInsert film
Blinking YellowUnable to scanBlinking YellowRemove film
Blinking RedScanner Error


\ multiviews of scanner /

Software

PSI
* Scanning: Feeding, Index number
* Views and controls: Toolbars, Interface
* Framing
* Export save, Archives

Part 2
* IQueueIII, IQueue setup
* Products, contact sheets
* Package automation
* TLXClient Demo overview

Part 3
* Scanning Panoramic

Setup
* Install details - on a old Windows XP computer.
* Install details - on VMware (Windows 7)
* Remote connection - Connectivity to the old Windows XP computer from a modern computer.
* Troubleshooting and tips

PSI

The scanning software is called PSI IQ (Pakon Scanning Interface). There are two interfaces, EasyOrder and Classic view. Switch between them by clicking the change view toggle button. It may ask for a password which by default is blank. This guide mostly focuses on the Classic view interface as it is indeed better for scanning your own work, while the Easy Order (when setup properly) is often better for scanning customer orders. The Easy interface also has larger buttons perfect for touchscreen monitors.

\ EasyOrder view /

Since it was designed for photo finishers, it may have printing options and features some end users might not have a need to use. The accepted films types are C-41 and B&W films. Early versions (before build 3.26) of the software can not work properly with black and white films. It is not natively compatible with E6 slide film at all. The files produced are 16-bit, RGB with a maximum resolution of 3000 x 2000 (automatically cropped to 2941 x 1960) at 300 DPI. Digital ICE can be used during scanning of C-41 colour films, enabling this does not increase the scan time very much compared to most scanners. It is able to scan 19 rolls an hour (24exp, at highest quality setting) or 15 rolls an hour with Digital ICE. Scanning strips increase time as you have to remove and reload each strip.

The scanner digitizes the entire roll/strips, the software recognizes the frames of each exposure. It does not capture each exposure like most scanners. Quality setting can be changed from 4, 8, 16 base (1500x1000, 2250x1500, 3000x2000). The software can also read the frame codes via OCR from the film; so multiple film strips on a roll can be scanned out of order and the software will reorganize it.

Scanning
Scans start by creating a new order session and pressing the film strip icon (add roll from the scanner) button for each roll of film. The scans can be done with a full uncut strip, or in multiple strips of 4, 5, 6 exposure cut strips. A 3 exposure strip does indeed work but without DX code reading. Scanning multiple cut strips require more attention in the film strip orientation as well as to the LED's on the top of the scanner. When creating a new order select the number of frames on each strip, type of emulsion, resolution, and enter a Roll ID. I'd suggest using dust and scratch removal for C41 colour film; while disabling it for B&W. Wait for the scanner to warm up.


\ Adding a roll /

\ scan settings /

Feeding the film
Position the DX code on top and lowest frame number first. Insert the film slowly to the slot on the right with the emulsion side facing you. Insert until the motorized rollers catch the film. Upon exit of the film ensure that the path is clear and that the film is rolled up into the front bin properly. This is essential for curlier non-flat films as they can sometimes jam up and cause an error in the feeding. Wait a few minutes for the scan to complete.

For film strips, insert the first strip to the slot on the right with the emulsion side facing you. When the first strip is finished, the right film LED will blink which means to remove the finished strip from the film exit path. Upon removal, the film LED's will change to green, but will continue blinking with the lamp's green LED ready for a new strip. Insert additional strips and repeat until the cut roll is complete and press the stop button in the software.

Index number
As the system uses index frame numbers. Mixing strips from different rolls on the same order will often confuse the software with the exposure frames displaying out of order. Exposed film leaders can also sometimes confuse the software as they are often marked with frames in the 40-60 range, or XXX, XX, X and similar. When this happens after the scan session PSI complains via a pop-up warning dialog of index issues and can automatically rename all the frames with issues by pressing index all. The duplicate frame numbers tend to be renamed xA. Example a duplicate frame 7 will be rename 7A, or if the frame is 7A, it is often rename to 7B or something similar. High number 50-60 frames tend to be shuffled to the end of the order, while the X's are usually in the front but again often out of original shooting order. If absolute frame index numbers are essential to your workflow, they can be manually changed by selecting the exposure frame and inputting the desired frame index. Pre-wind exposure cameras and upside down shooting cameras reverses the shooting order and or requires the orientation to be changed.

\ Index number /

Views and controls
Toolbars
The EasyOrder interface only has the status control toolbar while the Classic view has both bars. Most functions of the "classic" bar is within the EasyOrder interface, so no operations are missing.
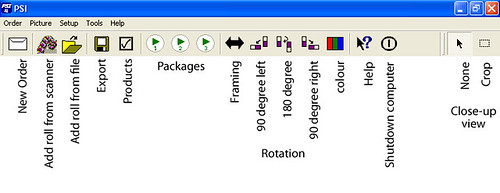
\ Classic toolbar /

\ status control bar /

The interface can be configured so that strips can be displayed by the number of images horizontally. This makes it easier to organize as you can view them by common strip sizes of 4, 5 or 6 frames across, or a view all option.
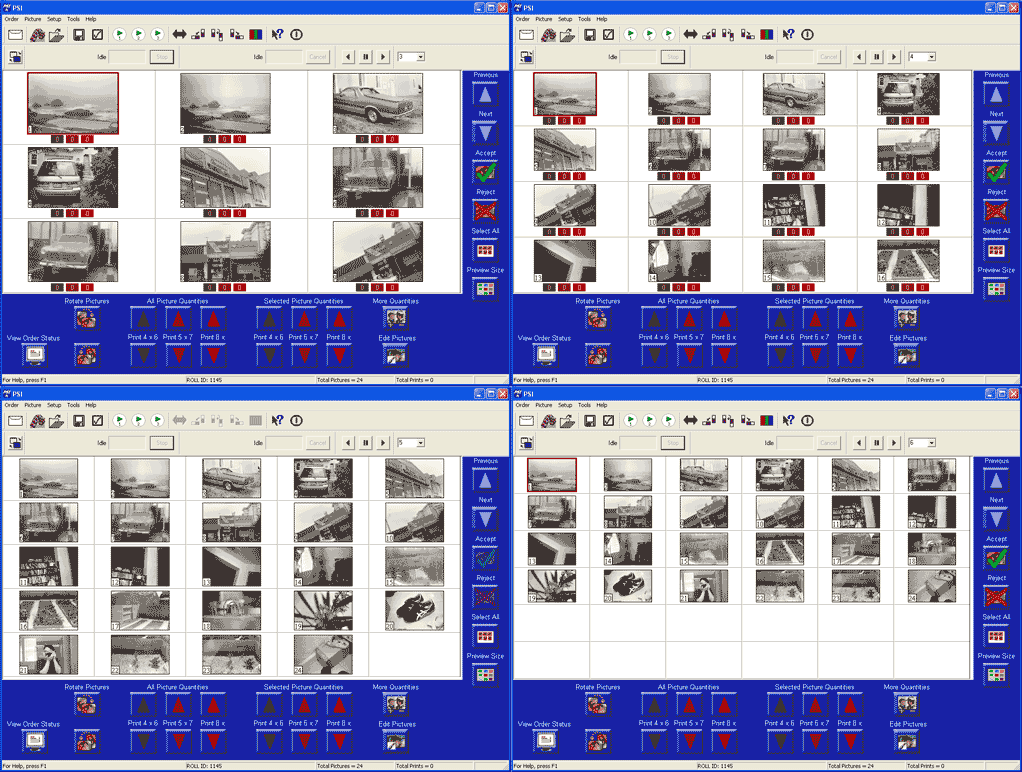
\ Classic View | Print Qty | Horizontal adjustment /

The main view is the Print Quantities view. This is used to select the number and size of photos to be printed. It has three red coloured blocks below the frame for 4x6, 5x7 and 8x10. By pressing the More Quantities button this changes the print sizes to 3.5 x 5, 4 x 7 and 5 x 9.


\ Quantities view /


A Edit view is also available with basic modifications including contrast, brightness and colour adjustments. Individual, multiple or all of the photos can be selected for modification. An additional more edit options are available for converting photos to B/W (Normal/cool modes) and Sepia. Double click the frames to increase the size of that particular photo.


\ Edit view: colour correction, effects /

On the right of each frame are grey (brightness), white (contrast), red, green, and blue boxes (colour adjustments) with a number. These represent modifications done to the photos. 0 (zero) is no modification. In more "more edit effect mode", grey (saturation) and white (sharpness).
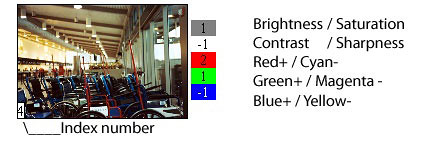
In this close-up view the top right has a square tool that can be used for cropping. When the crop tool is selected, a eight pointed bounding box surrounds the photo. Modify these to adjust to the desired crop.

\ closeup view: crop /

Framing
Since one long strip is scanned instead of each exposure, every once in a while a frame or two may be out of alignment. Mend this by using the framing tool to shift the image within the frame. Single or multiple photos can be selected for frame adjustment in edit view. Pressing the adjustment buttons will move the framing, not the photo. Example; pressing any of the right adjustment buttons will move the frame to the right revealing more of the photo's right side. This has the same effect as moving the photo within the frame to the left. It can also be adjusted in single closeup photo view. Sometimes the framing is very wrong on almost every photo, this is usually caused by the film leader or partially exposed frames. This can often be remedy by re cutting the negative leader.
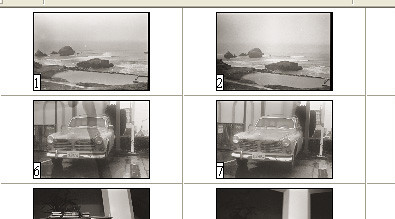
\ framing is incorrect on right side of the photos 1 and 2 /

   
\Select photos and use framing tool <-> to shift frames left/

Export save
All photos in the scan order are exported by pressing the export (floppy disc) icon. Photos can also be rejected and not included in the orders export. Rejected photos have a X. Rejected photos can be included in the export by pressing the Accept button. Saving the export will convert the scan order into multiple files. Another method is to select the photos you want exported and in the Export dialog check Selected Pictures only.

The default directory for the saved files is in the Pakon program files. You can choose your preferred location as in any other program, but this will reset to the default once again after each launch session of PSI. Pressing Create subdirectory with each Roll ID; will make a folder directory based on the roll ID with the exported files within. You can add a prefix to the file names during export, so instead of a file name of "AA001" (for photo index number 1) you can add any prefix such as "NIKF3-" and the file will be named "NIKF3-AA001". There is a Save as Raw option, but when used will not retain any modified settings like contrast, brightness, colour settings that were generated by the PSI software.

In the Image Settings tab you can select the output file format in TIFF, JPG, and BMP. If a JPEG setting is chosen, the quality of the compression can also be adjusted and the estimated file size is also displayed. A EXIF JPG format can also be selected, this adds Camera maker "Pakon, Inc" and Camera model "F135_PLUS" to the file information. The dimensions can also be adjusted. The default is Use scanned resolution, which is the resolution set during the beginning of the scan order. If this is unchecked you can scale or downsample the dimensions. When the Don't scan up option is checked the photos can only be decreased.

\ Export control /

\ Save options /

Archives
Archives of queued orders are located in the drive: IQueue\Archive directory. This makes it handy to retrieve older order sessions without having to rescan. This can be used if you forget to create products, or if you want to export additional photos after a partial roll export. It can be accessed in PSI by going to the Order menu and selecting Add Roll From Archive... This brings up a search window to find the order. Searches of inquires such as Roll ID, date and time can be accomplished. Select from the results and open the archive for import into PSI.

Note:If scanning many orders, sometimes this archive grows very large and consumes a lot of hard drive space. Horizontal frame adjustment cannot be done with archives as they are separate files.


\ Archives search /

END OF PART 1
continued,,, below
« Last Edit: May 10, 2022, 02:05:19 AM by tkmedia »
tk

The non-commercial camera encyclopedia
Camera-Wiki.org / Donate / flickr / Twitter

mcduff

  • Self-Coat
  • *****
  • Posts: 867
  • Loving the 645...
    • ...on Flickr...
Re: Unfinished Review: Pakon F-135 Plus scanner
« Reply #1 on: January 27, 2014, 04:43:42 AM »
This is all interesting,Tony. I would like to hear how it rates compared to the modern flatbeds (like the v700). I know they can fake a higher resolution, but an almost 6MP file is nothing to sneeze at.


---------------
check out Don's stuff at http://www.flickr.com/photos/mcduffco/

Francois

  • Self-Coat
  • *****
  • Posts: 15,767
Re: Unfinished Review: Pakon F-135 Plus scanner
« Reply #2 on: January 27, 2014, 03:01:23 PM »
I think the main thing with this scanner is speed.
I would do pretty much anything simply not to have to go through another lengthy scan on my flatbed.
Francois

Film is the vinyl record of photography.

mcduff

  • Self-Coat
  • *****
  • Posts: 867
  • Loving the 645...
    • ...on Flickr...
Re: Unfinished Review: Pakon F-135 Plus scanner
« Reply #3 on: January 27, 2014, 10:53:33 PM »
I am generally impatient but the slowness of the v700 I use does not bother me too much as I usually put a set of negs on "to cook" on it and try to forget about it. It is probably the post scanning stuff (cleaning up the dust etc ) that drives me nuts. Now I used to use an awesome dedicated scanner (one of the Polaroid SCSI units). I believe it may have been better quality than the v700 (I can't find any old scans to do a proper comparison) but its speed (and relatively small number of negs it could auto scan) did drive me nuts.
So I can live with the speed of the v700 - I would just like a scanner that was no less inconvenient and delivered a higher quality final product. Number if pixels is not too much of an issue - the 6mp of this unit could be fine if the quality and DR was there.


---------------
check out Don's stuff at http://www.flickr.com/photos/mcduffco/

tkmedia

  • Self-Coat
  • *****
  • Posts: 898
    • Camera-wiki the free camera encyclopedia
Re: Pakon F135 Plus scanner guide
« Reply #4 on: January 30, 2014, 05:51:35 AM »
      continued...
PART 2
---
Products

After all the scans are in the order. The photos can be sent to a printer. Index prints can be output to printer or saved to a file. This requires the IQueue III application. Launch the separate IQueue III setup (requires quitting IQueue III), click on 4x6, 5x7, 8x10, 3.5x5, 4x7 and 5x9 for prints or index. The CD button is also for changing the various settings to your preferred specifications. Relaunch IQueue III.

In PSI, go the the Order menu, then down to Create Products, click on the check boxes of the product options you desire. PSI will send the information to IQueue III, and the products will be created based on the settings of IQueue Setup.

\ PSI: Create Products /

\ IQueue III: Completed Orders: Thumbnail view /

Index Sheets / Contact Sheet
Index sheet can be quite a useful product. They can be created by using the create products feature. Since it is a product; it is based on settings in IQueue III setup. The sheet can be generated in various sizes. It can be sent directly to a printer or a file can be generated. If a file is desired; the save location, file name and image quality can also be specified. Notes can be added to the index sheet title head when starting a new scan order in PSI or afterwards by going to the order menu then down to notes and label.

\ Index sheet with notes and label/


\ Setting up index sheet in IQueue III setup/


\ PSI: Adding notes to index sheet /

Package
Packages automate the scan session's output. Example, if you always save to the same location, the same file format, you can always setup a simple "save as packages".

To setup, just use PSI, setup menu, select a "Package", check save as, click setup, change save location, change image settings. So after the scan session, just press the "package 1" button previously setup. It will do everything you define in the package setup. The location of save and image settings are retained. You can also automate the output of creating products. When configured properly, a single button press can create multiple actions such as created a index sheet, export the photos, burn a Pakon CD, print a CD cover on a laser printer and print the photos on a thermal printer.

\ setup package /

TLXClientDemo

The TLXClientDemo application can also be used for scanning as well. This is useful for scanning photos that are in a not in the standard 24 x 36 mm frame size. Examples include panoramic cameras such as the Fujifilm TX / Hasselblad XPAN series, Globuscope, Horizont, Noblex, Panon / Widelux, Lomography Spinner 360 and Sprocket Rocket. Also good for scanning film loaded for cameras not designed for the format. example loading 35mm film into medium and large format cameras and holders.


\ TLXClientDemo composite /

Originally sourced from facebook Pakon group posting from Kalma Juan | Screen grab of posting but have rewritten and expanded many parts.
  • Launch TLXClientDemo (Start, Programs, Pakon)
    (C:\Program Files\Pakon\F-X35 COM SERVER\TLXClientDemo.exe)
  • On the left pane click Scan
  • Select proper Film Color, Resolution and Frames Per Strip radio button settings as desired.

    \TLXClientDemo: Scan Settings/
  • Click Scan, and feed the film like usual. Remove film from exit path
  • On the left pane click Move Oldest Roll from Scan Group to Save Group.
  • A scan summary will appear, click OK.
  • Click Framing in the left pane to display the Framing Adjustment.
  • Click the Adjust Cropping radio.
  • Insert numbers to the left and right fields and use the Apply button to preview the results. Once the proper crop is correct, do a little math to calculate the difference between the left and right fields to get the cropping adjustment.
  • Use the Next button to advance to the next exposure, adjust left field and add the cropping adjustment to get the right field.
  • For wider panoramic exposures ensure that every photo is present and use the Delete Picture button to delete the extra photos at the end.
  • Adjust the Picture Attributes section on the right pane, making sure the File Name and Directory are as desired. The default Directory location is C:\Temp, but can be changed by typing in the desired location path. Click Apply to confirm any changes and repeat for additional exposures.
    Double check the file names for each photo. Rename if necessary. Make sure they are all different so they don't overwrite existing photos. This is most important if in step 6 you have DX code errors as all the photos will be named DX_ERROR. If you are not exporting all photos use the radio button Selected under the directory path.
  • Click the Save Button on the left pane.

    \TLXClientDemo: Save Settings/
  • In Picture Selection select All Pictures. If you are not exporting all photos choose Selected pictures only.
  • In Type of Save Operation select To Disk
  • Choose your preferred file type and click OK. Remember to uncheck scratch removal if scanning B&W film. Your photos will be located in the directory specified in step 12.


xTRA PART 3: Panoramic


Concluded
Pros
  • Fast!
  • Quiet operation
  • High quality
  • Do not have to load cumbersome holders. Good for curly film
  • with dedicated hardware, easy to burn CD, and index prints.

Problems issues
  • can only scan strips with a minimum of 4 frames (3 without DX).
  • the reading of the frame codes can often lead to errors of mis numbering of the frame index number. Correct frame index numbers are essential as frames with duplicate frame numbers can often overwrite another photo on export.
  • odd/long film leaders may cause improper spacing between exposed frames. This can be adjusted in the in software with horizontal frame adjustment.
  • does not have the ability to automatically reorder the file names on backwards shooting prewind cameras.
  • initial setup. older OS and computer required. VM works but often troublesome, YMMV

END
The major advantage of the unit is speed with good quality scans with little effort.

Examples
There are plenty of example on the flickr group Pakon/Kodak F-135 Film Scanner.

Links
* Silver Light Alchemy: New Scanner - Kodak/Pakon F135 Plus by D. Matthew Dair
* Pakon F135: First Impressions by Trevor Saylor
* Medium: The Best Scanner: How to get the most out of your film photography by David Charlec
* If Time Stood Still: THE PAKON F135 review by Mark Ewanchuk
* Queimando Filme: Kodak Pakon F135 Plus: o salvador de workflows by Pedro Costa Neves
* Scanner Comparison: Pakon F135+ vs Epson V600 Photo Scanner by Lorenz Gohlke[/list][/list]
« Last Edit: May 10, 2022, 02:20:17 AM by tkmedia »
tk

The non-commercial camera encyclopedia
Camera-Wiki.org / Donate / flickr / Twitter

mcduff

  • Self-Coat
  • *****
  • Posts: 867
  • Loving the 645...
    • ...on Flickr...
Re: Unfinished Review: Pakon F135 Plus scanner - updated 14/01/28
« Reply #5 on: January 30, 2014, 07:59:32 PM »
Perhaps I am dense and it is staring me right in the face, but can I assume the first image is the pakon and the second is the espon?
---------------
check out Don's stuff at http://www.flickr.com/photos/mcduffco/

tkmedia

  • Self-Coat
  • *****
  • Posts: 898
    • Camera-wiki the free camera encyclopedia
Re: Pakon F135 Plus scanner guide
« Reply #6 on: January 30, 2014, 10:04:56 PM »
not overlooking anything, had not written the part on the compare... was too darn lazy... making dumplings, and cake during chinese new years eve.

iirc the Polaroid SprintScan was the series of scanners.
« Last Edit: August 15, 2014, 10:21:09 PM by tkmedia »
tk

The non-commercial camera encyclopedia
Camera-Wiki.org / Donate / flickr / Twitter

tkmedia

  • Self-Coat
  • *****
  • Posts: 898
    • Camera-wiki the free camera encyclopedia
Re: Pakon F135 Plus scanner guide
« Reply #7 on: February 01, 2014, 10:05:40 PM »
did a test and looks like I figured out how to do index prints!  ;D I used a different system and installed a scsi card. now to attach a scsi cdr drive so i maybe can make cds?
---
    Installing the Software
    ---Basic---
    There are two main installers for software. Pakon F-X35 and Pakon PSI F-X35. Pakon F-X35 setup the F-X35 Com Server, PTS (Pakon Trouble Shooter), Firmware Loader and TLX Client Demo. Pakon PSI F-X35 installs PSI and IQueue.
     
    Installing on Windows XP requires the screen resolution of 1024x768. You can change it back to your preferred resolution after the install. If a Pakon install disc is included in your setup, and autorun is enabled in Windows XP, it will automatically launch a installer upon disc insertion. Disregard the installer and follow the steps below.
    • (A) first open the software installer root directory and go to the fx35install directory
    • (B) launch setup to install fx35 (Pakon F-X35)
    • (C) If not installed already, it will ask if you want to setup Microsoft's .net 1.1 framework. (D) The installer will setup .net 1.1 framework Service pack 1. (E) It requires a computer reboot. If already installed; the previous steps are skipped. (F) It is followed by fx35 finishing the setup.
    • (G) go to the root of the install and launch setup, to install Pakon PSI F-X35.


    \1. Go to F-X35 install directory /                                     \ 2. Install F-X35

    \3. F-X35 install .net 1.1/

    \ 4. install PSI F-X35 /
    Drivers
    Attach the USB cable to the computer and power on the scanner. Make sure that the LED's are a solid green colour. The computer will find new hardware. It will sometimes prompt to install a unsigned driver, if it does you should continue to install. After a restart, sometimes it will install drivers again. If this happens; from what I've seen, the first time it usually installs driver "Pakon F135 USB 1.0 Scanner - F135 Motherboard". The second time a different "Pakon F135 USB 2.0 Scanner - Version 2", is usually installed.

    \ Found Hardware /


    \ Device manager /

    ---Other installs---
    Install ASPI manager

    Note: Many virtual machine environments are incompatible with these software drivers, so you might not be able to use the IQueue functions.

    If you want index prints, cd writing, cd label/cover creation; it may require additional steps. If an ASPI Manager is not already installed; one must be present for the IQueue III program to function fully. ASPI is software for optical drives. It was used by software developers in order to write programs for ASPI which can then control the drives. Check to see what drive model you have by going to device manager. Check to see if your CD writer is supported by IQueue III, by going to drive:\Program Files\Pakon\IQ\DEVIST.txt. If it's supported it should work properly. Launch IQueue Setup in programs and it should list the drive.


    When the software from the previous steps are installed there is already a Nexitech ASPI Manager software in drive:\Program Files\Pakon\IQ\ASPI. Install this, I tried without complete success for my setup, but your results may be different. If it does not work try another APSI manager.

    Nexitech ASPI Manager
    • use killaspi.bat, this will remove other ASPI managers
    • install aspikit.exe
    • restart Windows. Note: Upon restart, it may take a bit longer for the desktop appear.
    Alternative ASPI managers
    Adaptec ASPI

    • download Adaptec ASPI Manager http://www.adaptec.com/en-us/speed/software_pc/aspi/aspi_471a2_exe.htm
    • extract the downloaded file. Default location is c:\adaptec\aspi
    • To install go to the command prompt.
    • go to the install directory c:\adaptec\aspi or where you extracted the files in step 2.
    • type install.bat XP32 for 32bit or install.bat XP64 for 64bit to install the ASPI Manager.

    FrogASPI
    If not try another ASPI manager, google searched for frogaspi, renamed frogaspi.dll to wnaspi32.dll and dropped it in system32 folder of the windows directory.

    --
    Test system
    System 1
    IBM SurePOS 780 Model 4800 W81, Intel Pentium 4, 2.4 GHz, 2 GB DDR 333-Mhz ram, 80 GB Hard Drive, Windows XP Pro SP3, IBM SurePoint 4820 15" touch screen (yes a cash register!)

    System 2
    Shuttle XPC SB61G2, Intel Pentium 4, 2.8GHz, 2 GB ram, 160 GB SATA Hard Drive, Pioneer DVR108 PATA DVD-RW drive, Adaptec AHA-2940AU Ultra SCSI interface card, Windows XP Pro SP3.

    System 3
    MSI board with NVIDIA chipset, Intel Celeron 420 1.6GHz (Conroe-L LGA775), 4 GB DDR2 ram, 160 Gig hard drive, Windows 7 Pro 64bit, SP1.

    Software
    PSI 3.0 build 3.26
    IQueue III 3.0.0.3
    IQueue III Setup 3.0.3.26

    Frog ASPI Manager 0.29.4.10
    Adaptec ASPI v4.71.2
    Nexitech ASPI driver 1.18

    EPSON Scan 3.242

    Operating system environments
    Microsoft Windows XP Professional Service Pack 2
    Microsoft Windows XP Professional Service Pack 3
    Microsoft Windows 7 using VMware Player 6.0.3 build-1895310, installed with Microsoft Windows XP Pro SP2, set for 1 GB ram, 40GB hard drive

    Scanners
    Kodak (Pakon) F-135 Plus, Epson GTX-770 (V500)
    [/list]
    « Last Edit: May 10, 2022, 02:31:44 AM by tkmedia »
    tk

    The non-commercial camera encyclopedia
    Camera-Wiki.org / Donate / flickr / Twitter

    jojonas~

    • Self-Coat
    • *****
    • Posts: 2,928
    • back at 63° 49′ 32″ N
      • jojonas @ flickr
    Re: Unfinished Review: Pakon F135 Plus scanner - updated 14/01/28
    « Reply #8 on: February 02, 2014, 03:09:11 PM »
    yay for index prints! I'd like that as a flip book to check through my negs
    /jonas

    Francois

    • Self-Coat
    • *****
    • Posts: 15,767
    Re: Pakon F135 Plus scanner guide - updated 14/02/03
    « Reply #9 on: February 04, 2014, 09:40:23 PM »
    I actually do them with Picasa. It's very easy to do.
    Francois

    Film is the vinyl record of photography.

    tkmedia

    • Self-Coat
    • *****
    • Posts: 898
      • Camera-wiki the free camera encyclopedia
    Re: Pakon F135 Plus scanner guide
    « Reply #10 on: February 04, 2014, 11:57:02 PM »
    Installing onto Virtual Machines

    VMware Player for Windows (tested on system 3)
    * Go to VMware website to download VMware Player. It is free for non-commercial use. If your using it for commercial use, there is a paid version for that.
    * Install VMware Player. It will ask for a operating system install, you can install from CD or an image file.
    * When creating a virtual hard drive, it is recommended to create a "non-expanding" . Variable image size tend to cause more issues with compatibility.
    * After VMware installs Windows XP, just follow the basic steps above. Install details.
    * Please make sure that Windows XP and PSI can find the scanner. If it's not connected, the scanner will not have a check mark and it will state Connect (Disconnect from host). This is essential for installing drivers, as sometimes it requires XP and the VM to restart. Afterwards the VM often disconnects from the Pakon. In VMware Player go to Play menu, Removable devices, and make sure the scanner is connected. If no drivers are installed it will display as USB Device something.
    * Launch PSI
    « Last Edit: August 31, 2017, 03:19:27 AM by tkmedia »
    tk

    The non-commercial camera encyclopedia
    Camera-Wiki.org / Donate / flickr / Twitter

    tkmedia

    • Self-Coat
    • *****
    • Posts: 898
      • Camera-wiki the free camera encyclopedia
    Re: Pakon F135 Plus scanner guide
    « Reply #11 on: February 13, 2014, 03:17:02 AM »
    Troubleshooting and tips

    PSI
    Failed to detect scanner

    Some setups are a bit picky and require the exact same USB port connector to be used. If this is the case, and if your setup requires unplugging the scanner every once in a while, plug it back into the same port as the one used when installing the drivers.

    Some are unable to use certain USB chipsets, some computers have multiple. Changing usb ports that use a different drivers for the chips may work, or another USB add on card may work. Computer board BIOS setting may also affect this. YMMV.

    In a virtual machine, ensure that the USB device is passed through to the virtual environment and not the native host computer.

    \ VirtualBox: USB device /

    Grey Photos
    The grid view looks fine, but close-up view and exports yeild odd looking or grey photos. This is because traditional black and white film was scanned with ICE turned on. ICE does not work with traditional black and white films, but does work with C-41 colour process black and white films. Rescan with ICE turned off to remedy.

    \ B&W with digital ICE /

    \ B&W without digital ICE /

    Automatic Roll ID
    If you just use numbers for the Roll ID, it can be set to automatically increase. To do so go to in the Setup menu and down to General and then to the Roll ID tab. Check Numeric only and Automatically Increment.


    Automatic export/products/rotation after scanning
    If you dont plan to use any of PSI adjustment features you can enable PSI to automatically run a package after the scan session is finished. To do so go to Setup menu, down to scanner, then down to scan mode. In the auto run section just choose a package you previously defined.

    If your camera is the type that captures onto the film upside down you might want to set the software to automatically rotate the photos 180 degrees. To do so; enable portrait mode and choose the rotation method.


    IQueue
    No output device
    The IQueue program may complain about not having any output devices. If you do not plan on printing like most, you can always set a device in IQueue setup to print a file instead of sending to a printer.

    Cannot quit IQueue
    Make sure IQueue is installed properly with a ASPI layer. If you don't plan on using IQueue, or if your set-up does not function properly with it, you can always disable IQueue from automatically starting with PSI. To do so launch PSI, go to the drop down menu Setup, then down to IQueue and uncheck Auto-Start IQueue.


    Cannot create additional products.
    Check to make sure that the queue is receiving incoming traffic and that the job order are not paused. Make sure in IQueue Setup that everything is configured properly and sent to the right printer and or file directory.

    Keyboard shortcuts
    Ctrl+S = Add Roll from scanner
    Ctrl+O = Add Roll from file
    Insert = Accept
    Delete = Reject
     
    A = Select Brightness Tool
    E = Select Red
    R = Select Green
    T = Select Blue
    S = Decrease Value
    D = Reset to Zero
    F = Increase Value
    C = Copy settings
    V = Paste settings
     
    Ctrl+R = Rotate right
    Ctrl+L = Rotate left
    Ctrl+C = Color Adjust
    Ctrl+F6 = Convert to B&W normal
    Ctrl+F7 = Convert to B&W cool
    Ctrl+F8 = Convert to Sepia
     
    Image display count
    2 = 2 wide
    4 = 4 wide
    0 = fit all
     
    Select
    Crl+A = All
    Home = beginning of row
    End = end of row
     
    Ctrl+P = Create Products
    Ctrl+1 = Setup Package 1
    Ctrl+2 = Setup Package 2
    Ctrl+3 = Setup Package 3
    « Last Edit: May 10, 2022, 03:07:45 AM by tkmedia »
    tk

    The non-commercial camera encyclopedia
    Camera-Wiki.org / Donate / flickr / Twitter

    tkmedia

    • Self-Coat
    • *****
    • Posts: 898
      • Camera-wiki the free camera encyclopedia
    Re: Pakon F135 Plus scanner guide
    « Reply #12 on: March 03, 2014, 06:16:45 AM »
    Remote access
    Many people dont want to deal with a extra Windows XP computer setup cluttering up their workspace for scanning. You can use the existing Windows XP Remote Desktop (Windows XP Pro) as a server and connect from your existing more modern computer operating systems such as, Windows 7, 8,  Mac OS X Snow Leopard, Lion, etc, a linux setup or just about anything.  All that is required is a suitable client application that can understand RDP. This way you can login to the scanning computer from your newer system and use a screen sharing feature. The advantage of this is better compatibility as virtual environments tend to have more odd issues that are not present in real hardware. Depending on your setup, it may also remove the need for an extra set of computer peripherals mouse, keyboard, screen, etc.

    Pakon scanner computer
    from How to Configure a Remote Desktop (Windows XP Pro) - at microsoft.com
    Step 1: Configure the Remote Computer
    On the remote Windows XP Professional-based computer, follow these steps:

    • Click Start, and then right-click My Computer.
    • On the shortcut menu that appears, click Properties.
    • Click the Remote tab, and then click to select the Allow users to connect remotely to this computer check box.
    • When you are prompted to confirm this change, click OK.
    • Click Select Remote Users, and then click Add to specify additional user accounts to be granted remote access.
      NOTE: Administrators are automatically granted remote access privileges.
    • When you are finished adding user accounts, click OK. Make sure that the account that is being added does actually exist on the remote computer. If the account does not exist on the remote computer, create it.
    • Click OK, and then click OK again.
    The Computer name, domain, and workgroup settings are important for many clients. This information can be easily obtained by going to Start, Control panel, system and clicking on the Computer name.

    ----
    Windows 7
    Connect to Windows XP Pro scanning computer from Windows 7
    • Click Start button (windows icon)
    • type Remote Desktop Connection
    • click on Remote Desktop Connection when the results are displayed.
    • enter the computer name you want to connect to and enter any user account information you created previously.
    • To shutdown the scanning computer you can use the command prompt and type shutdown -s.

    Windows 8
    • On the right corner of the screen is the search field.
    • type remote desktop. Click the results displayed.
    • enter the computer name you want to connect to and enter any user account information you created previously.
    ---
    Mac OS X
    There is no built-in mac client for this. There are a number of solutions including a client from microsoft.
    Here are a few
    .
    ---

    Teamviewer

    TeamViewer is also a good option as it is free for non-commercial use. http://www.teamviewer.com/. Teamviewer supports Windows, Macintosh, Linux (Ubuntu, Debian, RedHat, CentOS, Fedora, SUSE), iOS, Android, Windows Phone 8.

    I recommend maybe using Teamviewer 6 on the Windows XP end and a more current version on your modern operating system.

    Overview of the setup is fairly straight forward.
    • Download on both computers and install.
    • Launch program on both computers.
    • The login and password details are automatically generated on each computer.
    • Enter this information from the computer you want to control.

    If a computer without a monitor or input devices is required. You can create a shortcut to the teamviewer program and put it in the start up directory.
    --
    Alternately you can also use a VPN product with VPN compatible software on both computers.
    --
    Some computers also complain about not having a keyboard attached and wont work properly. Many (but not all) have setting in the computer bios to halt on errors. Disable this and it should run smoothly.

    \ BIOS: Keyboardless /

    \ BIOS: Halt On /
    « Last Edit: May 10, 2022, 03:10:02 AM by tkmedia »
    tk

    The non-commercial camera encyclopedia
    Camera-Wiki.org / Donate / flickr / Twitter

    Francois

    • Self-Coat
    • *****
    • Posts: 15,767
    Re: Pakon F135 Plus scanner guide - updated 14/03/02
    « Reply #13 on: March 04, 2014, 10:14:17 PM »
    There's also another way to do this and just bypass microsoft's software altogether!
    There's a program called TeamViewer that is available as both a Windows portable (http://portableapps.com/apps/utilities/teamviewer_portable), a full version or a Mac version!

    For the mac, you go here http://www.teamviewer.com/en/download/mac.aspx and get Teamviewer Host.
    For PC, you can go here http://www.teamviewer.com/en/download/windows.aspx

    The Windows and Mac versions are free for non commercial use.

    The way it works, you install the software on both machines. When you start the Windows XP machine in server mode, it gives you an access number and password. You then paste it the same numbers on either the Mac or Windows Vista/7/8/8.1 machine and you're connected.
    Francois

    Film is the vinyl record of photography.

    tkmedia

    • Self-Coat
    • *****
    • Posts: 898
      • Camera-wiki the free camera encyclopedia
    Re: Pakon F135 Plus scanner guide
    « Reply #14 on: March 05, 2014, 12:43:13 PM »
    Thanks, not sure why I forget about team viewer! Should have at least mentioned it along with VPN. As I use it as well.

    I have more details on remote desktop as its already installed and somewhat setup on xp systems.

    On another...is there any options for controlling 16/8 bit computer platforms? Atari, apple ii, commodore, MSX, windows 31?
    « Last Edit: August 15, 2014, 10:22:35 PM by tkmedia »
    tk

    The non-commercial camera encyclopedia
    Camera-Wiki.org / Donate / flickr / Twitter

    Francois

    • Self-Coat
    • *****
    • Posts: 15,767
    Re: Pakon F135 Plus scanner guide - updated 14/03/02
    « Reply #15 on: March 05, 2014, 03:07:02 PM »
    Well, since Commodore doesn't have network support, the best you can do is use an emulator. CCS64 is pretty much the best out there.
    For Atari 2600, I kind of like the Stella emulator.
    For Apple ][ (I wonder who the heck remembers that they used the square brackets to make the II), there Apple IIe
    I remember I have an MSX emulator but can't remember which one.
    Windows 3.1 could probably run something... though I'd rather run it under XP using Dosbox Portable (and yes, it works!)

    I also recently discovered that the venerable Win98 can be installed to a USB drive and has a special Kernel patcher available for it so that it runs most WinXP programs... this thing must be blazing fast on my old 2ghz machine!
    Francois

    Film is the vinyl record of photography.

    tkmedia

    • Self-Coat
    • *****
    • Posts: 898
      • Camera-wiki the free camera encyclopedia
    Re: Pakon F135 Plus scanner guide
    « Reply #16 on: March 05, 2014, 08:33:05 PM »
    Windows 3.1 could probably run something... though I'd rather run it under XP using Dosbox Portable (and yes, it works!)

    I wish I could, the program app only runs in win3x. It's an old controller at a manufacturing plant. oops, I didnt mean commodore i meant Amiga. I know a friend at a small TV bulletin board station that still uses it for character generation. Most but not all emulators are out as these systems interact with external hardware.
    « Last Edit: August 15, 2014, 10:22:54 PM by tkmedia »
    tk

    The non-commercial camera encyclopedia
    Camera-Wiki.org / Donate / flickr / Twitter

    Francois

    • Self-Coat
    • *****
    • Posts: 15,767
    Re: Pakon F135 Plus scanner guide - updated 14/03/02
    « Reply #17 on: March 05, 2014, 11:14:27 PM »
    I must admit that if he uses a videotoaster, he's stuck with the old hardware from start to finish.
    Francois

    Film is the vinyl record of photography.

    tkmedia

    • Self-Coat
    • *****
    • Posts: 898
      • Camera-wiki the free camera encyclopedia
    Re: Pakon F135 Plus scanner guide - updated 14/03/02
    « Reply #18 on: March 18, 2014, 09:12:50 AM »
    Toaster? Nothing that complex. It is a MagicBox Alphagen character generator based on a classic Amiga. The Windows 31 setup is a controller for a CNC machine it do not even have a 3,5 floppy, but 5 1/4!

    Looks like Windows XP may cause some issues in the future, but I'm not too worried. I still see plenty of POS machines that uses OS/2!
    tk

    The non-commercial camera encyclopedia
    Camera-Wiki.org / Donate / flickr / Twitter

    Francois

    • Self-Coat
    • *****
    • Posts: 15,767
    Re: Pakon F135 Plus scanner guide - updated 14/03/02
    « Reply #19 on: March 18, 2014, 01:19:29 PM »
    Funny thing is I've been looking at what's going on for XP and discovered that the guys at RyanVM are working on a service pack 4 for XP.
    Also, there's a pretty active win98 scene that even produced a recent service pack with new files and all the stuff (it was introduced this year!)
    Francois

    Film is the vinyl record of photography.

    tkmedia

    • Self-Coat
    • *****
    • Posts: 898
      • Camera-wiki the free camera encyclopedia
    Re: Pakon F135 Plus scanner guide - updated 14/03/02
    « Reply #20 on: March 18, 2014, 06:36:39 PM »
    After the final updates next month, Microsoft will continue to support various Embedded: Standard 2009 (1.8.2019), POS (4.12.2016), POSReady 2009 (4.9.2019) XP flavors the next few years, my guess is some of those can also be integrated into XP.

    For the CNC machine I ended up just improving the existing setup by adding a 3,5 inch floppy, CD -R drive with a version of goldenhawk cd burning app for dos, adaptec cd creator for win31, DOS cd driver, DOS mouse driver.

    Recently I'm building a silly but handy removable drive rack out of a old dual 7 bay CD server, which can read various Iomega Zip/ JAZ, Syquest 44/88/200/'EZ', SuperDisk, various 3 and 5 inch MO, and CD/DVD/DVD-RAM. When I sort through some of my junk, I'll throw in a few older DAT/DDS, DLT, LTO, AIT, VXA, and Travan tapes drives as well! ;D
    « Last Edit: March 20, 2014, 04:38:12 AM by tkmedia »
    tk

    The non-commercial camera encyclopedia
    Camera-Wiki.org / Donate / flickr / Twitter

    Francois

    • Self-Coat
    • *****
    • Posts: 15,767
    Re: Pakon F135 Plus scanner guide - updated 14/03/02
    « Reply #21 on: March 18, 2014, 08:32:19 PM »
    Isn't it funny how computer guys always end up collecting so much "junk"?
    I actually spent the afternoon doing some weird electronics stuff...
    Thing is I have an old Compaq desktop (compaq EVO pancake) that I use as a fileserver (I have 2.5tb attached through a USB2 card). But I grew tired of having to crawl under a desk to start it. So I devised a plan to just split the wire that goes to the power switch and attach some sort of remote control to it. Simple enough until I discovered that this board was custom made by Compaq (uh uh!) and through some Mickey Mouse engineering, they soldered the switch directly to the board. So I ended up removing the board, soldering some wires to the little stems of the switch and fit the board back in. Only problem, the board uses some weird snapping pins to hold it in place. So I had to dremel the heck out of them in order for the board to reinstall... Now all I have to do is figure out how to get 12V out of the box without the connector shorting on the case... I have begun making a nice remote with an LED indicator and a big green power button :)
    Francois

    Film is the vinyl record of photography.

    tkmedia

    • Self-Coat
    • *****
    • Posts: 898
      • Camera-wiki the free camera encyclopedia
    Re: Pakon F135 Plus scanner guide - updated 14/03/02
    « Reply #22 on: March 19, 2014, 04:37:27 PM »
    I don't have half the junk I used to, as it seems every 4-5 years or so I move a few hundred to thousands to miles away.
    tk

    The non-commercial camera encyclopedia
    Camera-Wiki.org / Donate / flickr / Twitter

    Francois

    • Self-Coat
    • *****
    • Posts: 15,767
    Re: Pakon F135 Plus scanner guide - updated 14/03/02
    « Reply #23 on: March 19, 2014, 09:26:37 PM »
    That's one good way of looking at it.
    My dad's cousin has been working in IT for over 20 years and has a garden shed full of stuff he doesn't know how to properly dispose of.
    Anyone wants an 8088 with a hercules display card and green well burned-in CRT?  ;D
    Francois

    Film is the vinyl record of photography.

    Byteside

    • 35mm
    • *
    • Posts: 9
    Re: Pakon F135 Plus scanner guide - updated 14/03/02
    « Reply #24 on: August 06, 2014, 10:36:05 PM »
    tkmedia, thank you for the great post on this amazing machine. Your post is one of the reasons I bought the pakon. I have already scanned over 2000 old negatives and I'm very content with the results! Some old shots were done with disposable cameras (or something), those are very noisy and ugly. But the ones (probably) correctly shot with a Fujica STX-1n are amazing.

    However, I do have one question. Do you perhaps know more about the turned off option "Custom Framing"? It's under Setup>Scanner>Custom Framing. I'm hoping this option can be turned on and it will allow me to scan 126 film better. I know that not the whole image of 126 negative film can be scanned because of the 'wheels' in the machine, but perhaps it's software (or even hardware) possible to scan 126 film adequate.

    On other news, Kodak might perhaps give the software an update: https://twitter.com/kodakCB/status/496321153401896961
    « Last Edit: August 06, 2014, 10:49:15 PM by Byteside »

    tkmedia

    • Self-Coat
    • *****
    • Posts: 898
      • Camera-wiki the free camera encyclopedia
    Re: Pakon F135 Plus scanner guide
    « Reply #25 on: August 07, 2014, 03:08:17 AM »
    tkmedia, thank you for the great post on this amazing machine. Your post is one of the reasons I bought the pakon. I have already scanned over 2000 old negatives and I'm very content with the results!
    Thanks, it was originally a filmwasters magazine article, but repurposed into a usage guide as there was so little information. I'm glad you like the results!
    However, I do have one question. Do you perhaps know more about the turned off option "Custom Framing"?
    Dont really know much about it, I think it was for IX240 APS film. but there are some very odd options in various older revision of the software. I remember a automatic sleeving option for the older machines.

    On other news, Kodak might perhaps give the software an update: https://twitter.com/kodakCB/status/496321153401896961

    They have been trying for a bit. I really dont know how the original software was developed and what team developed it. There are some simple basic things that need improvement. Even minor things like a better installer will be an improvement. Wanting Mac compatibility is usually not that simple. I think options like half frame and panoramic options are reasonably new features that can be implemented.
    « Last Edit: August 15, 2014, 10:23:26 PM by tkmedia »
    tk

    The non-commercial camera encyclopedia
    Camera-Wiki.org / Donate / flickr / Twitter

    Byteside

    • 35mm
    • *
    • Posts: 9
    Re: Pakon F135 Plus scanner guide
    « Reply #26 on: August 07, 2014, 11:50:37 AM »
    Thank you for the quick reply.

    Do you perhaps know where I can get the older software? Google has let me down this time..

    tkmedia

    • Self-Coat
    • *****
    • Posts: 898
      • Camera-wiki the free camera encyclopedia
    Re: Pakon F135 Plus scanner guide
    « Reply #27 on: August 08, 2014, 04:50:46 AM »
    I have no clue, I do not think they are available on the web. I have at least three different minor revisions of the software somewhere. Maybe it's on a few of my system backup tapes from 10 years ago, but finding it is more difficult as they all have to be restored properly in order to looked thru and that takes a massive amounts of time.
    tk

    The non-commercial camera encyclopedia
    Camera-Wiki.org / Donate / flickr / Twitter

    Bennybee

    • 35mm
    • *
    • Posts: 9
    Re: Pakon F135 Plus scanner guide
    « Reply #28 on: August 13, 2014, 10:51:13 AM »
    Hi all,

    Thanks for the interesting article on the Pakon F135+ film scanner!
    Also impressed by the glowing comments on that scanner, and looking for a way to have fast access to digital images from my b/w rolls, I decided to order a scanner from AAA Imaging.
    My Minolta Dimage IV does a good scanning job, but the process is very slow and the post treatment in PSE doesn't encourage much film shooting.
    The Pakon arrived two days ago and since then I have been trying to scan some images, without succes.
    I reinstalled the Pakon software three times and that finally seems to work now : the scanner starts grabbing the film and moves it forward.  However, just when the front of the film strip comes peeping at the other side of the scanner,  the unit stops advancing and I get an 'Error 1003' pop-up on the screen.  I already tried blowing some compressed air in the film entry slot and I tried with a 4-frame strip of color film as well as an uncut roll of Agfa APX100 b/w film : same issue.

    I have a Medion PC with i7 processor and  Win8,  but I installed VMware Player with WinXP professional SP3.
    Did anyone else here encounter the same issue and what do I need to do next please?  Thanks a lot in advance!  I would really like to get this thing working...

    Best regards,
    Benny

    Byteside

    • 35mm
    • *
    • Posts: 9
    Re: Pakon F135 Plus scanner guide
    « Reply #29 on: August 13, 2014, 03:20:58 PM »
    Did you also try the program TLXClientDemo? It comes with the installed programs. It gives a little more info when you scanned something and you have the option to calibrate some stuff. Perhaps try that.

    Francois

    • Self-Coat
    • *****
    • Posts: 15,767
    Re: Pakon F135 Plus scanner guide
    « Reply #30 on: August 13, 2014, 09:24:40 PM »
    The computer doesn't really have much to do with software anymore.
    With windows 8, you might have to run the software in compatibility mode.
    I have to do that with Photoshop CS3 on Win7
    Francois

    Film is the vinyl record of photography.

    tkmedia

    • Self-Coat
    • *****
    • Posts: 898
      • Camera-wiki the free camera encyclopedia
    Re: Pakon F135 Plus scanner guide
    « Reply #31 on: August 15, 2014, 06:24:25 AM »
    Sorry benny. I really do not know, I run this scanner as a "processor" on the recommended hardware and software of the era. On a modern computer I use a client and screen/file sharing to control everything on the processor. More complicated initial setup, but much less issues imo.
    « Last Edit: August 15, 2014, 06:26:01 AM by tkmedia »
    tk

    The non-commercial camera encyclopedia
    Camera-Wiki.org / Donate / flickr / Twitter

    Bennybee

    • 35mm
    • *
    • Posts: 9
    Re: Pakon F135 Plus scanner guide
    « Reply #32 on: August 15, 2014, 09:30:40 AM »
    Hi all, just a short update : I finally got the scanner working - sort of.
    I manually installed the ASPI software bit, thinking that the scanner might act up if it doesn't find an output device (because I also got pop-up warnings saying 'no output device'). I figured no output device needed since I planned to save the scanned files on my HD anyway...
    I also supposed that opening the 'Install' file on the CD would install all the necessary bits & pieces to enable the scanner to work properly. Apparently you need to manually install some bits too (f. ex. the ASPI).  I don't know IF this is what got the Pakon working, but it works now.  No more 'Error 1003' message, except that it stops scanning somewhere mid-roll (an uncut 24 frame b/w Agfa APX100 film) and displays 'Error 149'.  According to comments on the Pakon Facebook page this would mean a full memory.  I will look into that this weekend and report back here.  At least I got a dozen of scans now... yeah!
    Thanks all & kr
    Benny
    « Last Edit: August 15, 2014, 10:38:32 AM by Bennybee »

    jbark

    • 35mm
    • *
    • Posts: 1
    Re: Pakon F135 Plus scanner guide
    « Reply #33 on: August 15, 2014, 03:45:14 PM »
    Good to hear!  I just got a Pakon F135 the other day and was getting the same error (1003).  I'm using a Lenovo W510 laptop  with Windows 8.1 and VirtualBox.  I really just wanted to be sure I didn't have a defective scanner, so I hooked it up to an old Compaq laptop with Windows XP and it works flawlessly.

    As tkmedia stated, it may be best run on hardware in the era of when the scanner software was written. Although that isn't easy to do for some people.  Luckily, I have a bunch of old computers that always server a purpose in some way.

    There is certainly some disconnect with VirtualBox and the scanner software.  I will try some different ASPI installs as well, but if that doesn't give me similar results as the physical PC, I'll just RDP in the old Compaq and call it good enough.  I have HUNDREDS of negatives to process, so, I'll probably just put my time into that instead of reinventing the wheel.

    Francois

    • Self-Coat
    • *****
    • Posts: 15,767
    Re: Pakon F135 Plus scanner guide
    « Reply #34 on: August 15, 2014, 08:58:49 PM »
    If you have a bit of computer knowledge, you can always use a tower and two drives that have both operating systems on them.
    Or you can always use a boot manager and have both OS on two partitions...
    Francois

    Film is the vinyl record of photography.

    tkmedia

    • Self-Coat
    • *****
    • Posts: 898
      • Camera-wiki the free camera encyclopedia
    Re: Pakon F135 Plus scanner guide
    « Reply #35 on: August 15, 2014, 10:54:03 PM »
    I did not have good luck in VM environments. I tend to like every feature to function properly. Based on the facebook group, many seem to use this on a VM with just the main scan function. I really cannot personally answer many questions with VM as there are so many combination revisions and because I don't use it. iqueue seems to be often broken with VM's. During the export process, I make index prints for every roll with psi rendering the photos and sending it to iqueue and creating a index file. I sometimes use the package feature to automate some of the task.
    « Last Edit: August 15, 2014, 10:56:54 PM by tkmedia »
    tk

    The non-commercial camera encyclopedia
    Camera-Wiki.org / Donate / flickr / Twitter

    Francois

    • Self-Coat
    • *****
    • Posts: 15,767
    Re: Pakon F135 Plus scanner guide
    « Reply #36 on: August 16, 2014, 02:54:03 PM »
    I never had much success with VM either. On my old AMD, sometimes it works, but more often it doesn't.
    That's why I like the dual boot better. Right now, I have two drives in my computer. One is running 7 and the other XP. I use XP when I need a lot of power to run stuff like photoshopping big images. It's slightly leaner than 7 starter edition.
    Francois

    Film is the vinyl record of photography.

    tkmedia

    • Self-Coat
    • *****
    • Posts: 898
      • Camera-wiki the free camera encyclopedia
    Re: Pakon F135 Plus scanner guide
    « Reply #37 on: August 17, 2014, 12:51:00 AM »
    I never had much success with VM either.
    I do use virtual machines to run old software, but if it's required to interact with old hardware it is much tougher with compatibility.

    Now, francois you mention...
    Quote from: Francois
    computer doesn't really have much to do with software
    That's not really 100 percent true either. I've had almost identical model system boards (diff revisions), with nearly identical spec and they worked differently running the same VM and program within. One worked great other had lots of crashing and errors.

    This is not my first single purpose computer system (cash register, btw) I built. I still have a Apple PowerMac G4 running classic Mac OS for using a Scitex Creo 12x17" flatbed scanner. At one time had a even older 68k Mac (840AV) running a older revision of Digidesign's ProTools as a DAW. I had a Atari ST for running Cubase for MIDI. And of course a Amiga 3000 for running NewTek's Video Toaster.
    « Last Edit: August 17, 2014, 12:55:52 AM by tkmedia »
    tk

    The non-commercial camera encyclopedia
    Camera-Wiki.org / Donate / flickr / Twitter

    Francois

    • Self-Coat
    • *****
    • Posts: 15,767
    Re: Pakon F135 Plus scanner guide
    « Reply #38 on: August 17, 2014, 04:04:43 PM »
    I must admit that interaction with physical devices is often more problematic than anything when it comes to obsolete systems.
    I had similar problems with a PVR that was made for XP Media Center and that just refused to work under Win7.

    Also, I too noticed that some VM are more reliable on some systems than others... I just can't figure out why since they don't do low level activity on the host OS...
    So far on my old clunker, I've had fantastic results running the older hardware under emulation but failure with generic VM. I can run Win 3.11 just fine under Dosbox but can't get Qemu to run... just annoying.
    Francois

    Film is the vinyl record of photography.

    Byteside

    • 35mm
    • *
    • Posts: 9
    Re: Pakon F135 Plus scanner guide
    « Reply #39 on: August 17, 2014, 10:01:17 PM »
    It's also possible to scan a 'roll' of 2 negatives. Two and half negatives is doable, but for two I had to remove the cover and feed them with a small plastic cleaner brush-thingy until the wheels got it. If the 35mm film has no clear dmx code it will happily ask for a next pieces of film (green blinking light) which you can just insert and it will push the previous one out. If there is a dmx code it will complain (orange blinking light) that you first need to remove it. This can be done with tweezers, but might damage the film and it does not always work. So what I did was, get a small pieces of adhesive tape on my finger and slowly insert it to press it against the film and then remove the film.

    I still got to figure out a way to scan all those Einzelgänger negatives...

    tkmedia

    • Self-Coat
    • *****
    • Posts: 898
      • Camera-wiki the free camera encyclopedia
    Re: Pakon F135 Plus scanner guide
    « Reply #40 on: August 17, 2014, 11:02:41 PM »
    be careful with tape. You do not want it to detach!
    tk

    The non-commercial camera encyclopedia
    Camera-Wiki.org / Donate / flickr / Twitter

    Byteside

    • 35mm
    • *
    • Posts: 9
    Re: Pakon F135 Plus scanner guide
    « Reply #41 on: August 17, 2014, 11:08:39 PM »
    Good point! I used not very strong adhesive tape.

    Byteside

    • 35mm
    • *
    • Posts: 9
    Re: Pakon F135 Plus scanner guide
    « Reply #42 on: September 01, 2014, 01:20:30 PM »
    Is there any news about this?: https://twitter.com/kodakCB/status/496321153401896961

    I got so many 126 film I want to scan. I hope it's (physically) possible with the Pakon. Is someone here also a member of the Facebook page? Do they perhaps have custom versions of the program or hack information like memory addresses?
    « Last Edit: September 01, 2014, 01:22:09 PM by Byteside »

    tkmedia

    • Self-Coat
    • *****
    • Posts: 898
      • Camera-wiki the free camera encyclopedia
    Re: Pakon F135 Plus scanner guide
    « Reply #43 on: September 01, 2014, 07:44:26 PM »
    I doubt anything will come from it. I am on the facebook group, mostly because I have too many people asking questions about this article on that group. It's the only reason I use facebook.

    EDIT: I'm no longer on facebook. Kept getting constant bickering and complains on various groups when I try to make it easier for other by sharing information I spent time researching.
    « Last Edit: September 14, 2014, 06:32:16 PM by tkmedia »
    tk

    The non-commercial camera encyclopedia
    Camera-Wiki.org / Donate / flickr / Twitter

    thatguychad

    • Peel Apart
    • ***
    • Posts: 328
    Re: Pakon F135 Plus scanner guide
    « Reply #44 on: September 04, 2014, 07:03:54 AM »
    I just installed Windows XP on an AMD E-450-based PC I have laying around in anticipation of getting one of these (bought from AAA Imaging via eBay.) I hate hate hate scanning 35mm on my Epson flatbed.

    Francois

    • Self-Coat
    • *****
    • Posts: 15,767
    Re: Pakon F135 Plus scanner guide
    « Reply #45 on: September 04, 2014, 03:54:18 PM »
    I don't blame you... the speed literally kills you.
    Francois

    Film is the vinyl record of photography.

    thatguychad

    • Peel Apart
    • ***
    • Posts: 328
    Re: Pakon F135 Plus scanner guide
    « Reply #46 on: September 05, 2014, 12:53:00 AM »
    Apparently AAA Imaging works as fast as my Epson and they just got around to shipping it. Is there a place I can get the software so that it's all set up and ready to go when the scanner arrives next week?

    I threw Windows XP "Black Edition" with all updates as of 8.23.2014 pre-installed and have found all the necessary XP drivers for the hardware (which shipped with Windows 7), the SMBus driver being the most difficult to procure (no AMD E-450 hardware shipped with XP, apparently). Nice and fast for what it is.

    wblynch

    • 35mm
    • *
    • Posts: 1
    Re: Pakon F135 Plus scanner guide
    « Reply #47 on: September 12, 2014, 03:49:56 PM »
    ...Is there a place I can get the software so that it's all set up and ready to go when the scanner arrives next week? ...

    There is a Facebook group for the Pakon F135 where they posted the entire install CD from the one I purchased a few years back.

    Finding anyplace to buy the software now is nearly impossible and the price can be from $150 to $400 depending on their mood.

    Try Facebook.

    thatguychad

    • Peel Apart
    • ***
    • Posts: 328
    Re: Pakon F135 Plus scanner guide
    « Reply #48 on: September 12, 2014, 05:19:18 PM »
    There is a Facebook group for the Pakon F135 where they posted the entire install CD from the one I purchased a few years back.

    Finding anyplace to buy the software now is nearly impossible and the price can be from $150 to $400 depending on their mood.

    Try Facebook.


    Thanks. My scanner came with the software, I was just trying to be preemptive while setting up the scanning PC. I was able to find it before my scanner arrived and all is well. I plugged the scanner in and was scanning 2 minutes later, love it so far.

    gsgary

    • Self-Coat
    • *****
    • Posts: 1,249
    Re: Pakon F135 Plus scanner guide
    « Reply #49 on: September 12, 2014, 06:05:14 PM »
    I was lost on page 2 all this computer talk go right over my head